It is recommended that you put new grips on your golf clubs at least every two years, if not annually. Also if you ever buy used clubs, you should install new grips. Most golf stores can do this for about $5 plus the cost of the grip. But if you are doing a full set of clubs it can get expensive.
I recently put new grips on my clubs. If I can do it with my DIY skills, then anyone can! It was relatively simple and took only a few minutes for each club. Here is how you go about it;
What you need
- Workbench vice
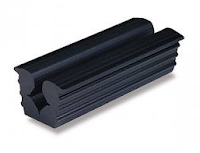
- Rubber vice clamp
- Sharp knife
- Paper towels or old rag for cleaning
- Adhesive grip tape (double sided)
- Mineral Spirits
- New grips – enough for all your clubs. If you are doing this for the first time you may need a couple of spares in case you mess up.
Step by Step Instructions
 1. Remove the old grip with a sharp knife. Be careful not to score too deeply and damage the club shaft. Under the grip will be the old adhesive tape; remove this also. If it doesn’t simply peel off you can use a special tool for this. I just use a standard stanley knife and scrape it off.
2. Place the club in a workbench vice. Use a rubber vice clamp so the shaft does not get damaged. You can get them for about $2 from most golf stores. It is really important that you use a vice to secure your club. Otherwise you will not be able to apply the pressure to put the grip on. I picked up a small portable table-top swivel vice from Harbor Freight for less than $25.
 |
| Rubber vice clamp |
3. Apply the adhesive grip tape onto the shaft of the club. The tape can be found at most online/ retail golf stores. Measure the grip to ensure that the tape will not show once the grip is on. Allow about 1/2″ of the tape to stick over the end of the shaft. I then twist it together and stick into down into the top of the shaft. This ensures that no liquid can get in the inside of the shaft and cause any rust.
4. Spray mineral spirits in the inside of the grip. 3-5 sprays should be good. There is no need to by shy, the more you use the easier it is to apply the grip. Put your finger over the end of the grip and swirl it around. Then pour the mineral spirits out and onto the adhesive tape which is attached to the shaft.
5. With one hand hold the shaft of the club and with the other hand slide the grip on. Do it quickly and in one smooth motion – do not stop until the grip is fully on. If you have used enough mineral spirits the grip should slide on easily. If you do not use enough mineral spirits the grip will not slide on and most probably get stuck or rip.
6. Wipe off any excessive mineral spirits from the club using an old rag or a paper towel.
7. Remove the club from the vice and allow to dry for an hour or two before use. The mineral spirits will evaporate and allow the adhesive tape to stick to the grip.
Here is a short video I found on YouTube to demonstrate the process…
Golf Grip Fitting
I use Winn Excel RF soft midsize grips in copper color (part # 6715W-CP). I love the feel of them – the grips feel really nice and soft in the hand. Also the color makes a change from generic black. I recommend that you go to your local golf store and try different grips to see what suits you. Also they will have samples where you can get fitted for size.
Typically golf grips come in three sizes; regular, mid-size and over-size. Here is the quick fit method for grip sizing (courtesy of http://www.rhodygolf.com):
- Take your grip with the left hand only.
- Take notice of where the ring and middle finger end up.
- If these fingers end up wrapped into the palm (like making a fist) then the current grips are too small.
- If the fingers on the other hand almost form the letter “c” then the grips are more than likely too large.
- A properly sized grip will fit in the players’ hand with comfort and the ring and middle finger will almost touch the palm
All of the parts required to do this can be purchased reasonably online through a website such as Hireko Golf.
